
Stamped concrete patio are decorative concrete that uses heavy-duty stamping and texturizing mats that mimics the shape and texture of other building materials such as tiles, wood planks and natural stone slabs
The process of stamping concrete can be time-consuming and labor-intensive. However, the average cost of poured concrete can be reduced by thousands of dollars when compared to more expensive premium building materials.
Read on to discover how these concrete stamp patterns can enhance your existing landscape, enhance the curb appeal of your outdoor spaces, and increase your home value.
Places Where We Can Install Stamped Concrete Patio
Stamped concrete patio can be used to create a unique look for entry walkways or natural stamp textures can be used to enhance the walking surface for outdoor entertainment areas such as hot tubs, pools, outdoor kitchens.
Here are some of the best locations to install stamped concrete patio
 Garden Pathways
 Garden Pathways
 Concrete stamping can be used to finish walkways around your yard’s gardens or outline features of your home’s front yard for enhanced curb appeal. Choose from a variety of stamped concrete patio designs that imitate the look of broken ground, natural stone, and even timber for a long-lasting, low-maintenance solution.
 Concrete Pool Decks
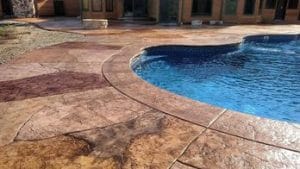 Concrete Pool Decks
 Use stamped concrete pool decks to enhance the look and feel of your pool and improve the structural stability of your hot tub or above ground pool. Stamped concrete patios protect your yard from heavy loads and create a clean and comfortable walkway for your guests to enter and exit your swimming spaces. Make sure these areas are sealed on a regular basis with non-skid additives to prevent water damage to your patio material and to improve slip-resistant features for added safety.
Outdoor Entertainment Areas
 Outdoor Entertainment Areas
An outdoor kitchen, outdoor grill, or outdoor fire pit are great spots for most homeowners to add decorative concrete slabs to. Concrete is strong and resistant to heat, making it the perfect surface to reduce fire risks around your home. By adding a stamped concrete patio you can create a project that will protect your home from flammable cooking utensils while creating an outdoor entertainment area that your friends and family can enjoy while waiting for their next meal.
Steps To Build A Stamped Concrete Patio
You may think that stamping concrete patio is a simple process, but there are a few important things you need to know before you begin. Here are some easy steps you can follow to create your decorative slab of concrete:
1. Prepare a Solid Foundation for Your Concrete Patio
Preparing the Subgrade and Subbase below your design footprint is the first step in pouring a concrete slab. The subgrade refers to the soil beneath the slab. The subbase is usually a thin, compacted gravel/sediment layer above the subgrade. To prepare the subgrade, you’ll need to remove any existing concrete and large rocks and other obstructions.
Once the soil has been cleaned and compacted, make sure the soil is firm enough to support your structure’s weight. If the soil isn’t firm enough, your structure won’t be as strong as it should be, and you’ll likely end up with multiple cracks, similar to what you’ll see in older concrete structures. Make sure your slab is at least 4” (10 cm) deep when you pour it, and don’t forget to add wire mesh or smaller rebar grids to enhance the patio’s strength and durability.
2. Lay Out the Shape of Your Patio Design
Imagine your patio in the shape you want it to be. Place board forms around the perimeter of the structure. Secure the forms with angled stakes or kicker boards. Use string lines and levels so your forms stay in a straight line at the right elevation over the subbase. Use thin, flexible materials to create curved paths. Use more support stakes to hold the form in place as the poured concrete hits the forms. Measure everything. Calculate the square footage of the project. Multiply the square footage by the path length or patio height to get the concrete volume.
3. Collect all Tools and Materials
For typical concrete projects, you’ll need float, trowel, hammer, impact driver, tape measure and level; but you’ll also need to collect texture mats so you can stamp concrete before it dries. You’ll need to hire a concrete mixer if you’re going to prep large amounts of concrete. Or, you can call one of the local paving companies and they’ll come out and pour concrete for you. If you choose to hire a paving company to do the prep work for you, they’ll be able to come out and pour the concrete directly to your project location.
However, if you hire a local paving company, make sure you plan out an adequate route so you don’t have to run back and forth to the project site with a heavy wheelbarrow full of concrete all the time. You don’t want to have to worry about logistics during the pour because you won’t know where to put the truck and the attached chute (or hose). If you hire a finishing crew you’ll be exhausted afterwards because you’ll have to keep going back and forth to and forth with the wheelbarrow full
4. Add Color Additives to the Concrete Mix
You can select from a variety of concrete additive colors to find the shade that best complements your project. These colors can be added to the mix prior to pour (integral color) or as topical color hardeners (broadcast color).
5. Pour and Finish the Concrete Slab
Create an even flow by pouring an even amount of concrete up to the height marks on the inner sides of the forms. Distribute excess concrete or “mud” to shallow areas with trowels or floats. Use a trowel or float to smooth the surface of the top of the concrete. This will create an even walkway for your patio with no air bubbles, no lumps and no larger sediment.
6. Apply Concrete Stamps or Texture Mats
To prevent your stamps from sticking to your uncured concrete slab once it dries, apply a color-release agent to the smooth side of the stamping mats. Once the concrete slab is dry, carefully arrange your stamps according to your design. This step is very important because if you miss a stamp, your design could be ruined. You will need to re-apply the stamping mat to the slab to make sure it is smooth before the slab hardens.
7. Cure, Wash and Seal the Stamped Concrete Patio
Once the slab has been installed and all the stamps have been applied, wait no more than 24 hours before taking off the mats. Rinse off the residue of the color-removing agent and apply the slab sealant to the slab. This sealant will keep your new patio moisture-free, UV-resistant, and resistant to wear and tear caused by foot traffic. It also requires less maintenance to maintain the concrete surface year-round.
Stamped Concrete Patios Pros And Cons
Like all projects, there are advantages and disadvantages to stamped patios. Take a look at some of the pros and cons below and decide if it’s right for you.
Pros:
- Mimics the look of brick, stone, or slate with customizable colors and patterns.
- More affordable than natural stone or paver installations.
- Resists heavy foot traffic and outdoor elements when properly maintained.
- Requires less upkeep than individual pavers,no need to reset or weed between joints.
- No gaps for weeds or pests, offering a clean, uniform finish.
- When it’s sealed, it’s easy to keep clean.
Cons:
- Can develop cracks from ground movement or freeze-thaw cycles.
- Matching color and pattern for small repairs can be challenging.
- May become slick when wet if not treated with a non-slip sealer.
- Sun exposure can dull colors over time without regular sealing
- Once poured and stamped, design changes aren’t possible.
Stamped Concrete Patio Vs Pavers
When comparing stamped concrete patios vs. pavers, both options offer unique advantages depending on your budget, style preferences, and maintenance goals. Stamped concrete patios provide a seamless, customizable surface that can mimic stone, brick, or slate at a lower cost. They are durable, easy to maintain, and ideal for large areas since they don’t require individual placement like pavers.
However, they can crack over time and are harder to repair because color and pattern matching is difficult. Pavers, on the other hand, offer greater flexibility and repair ease if one paver cracks, you can simply replace it. They also provide excellent drainage and a naturally slip-resistant surface. While pavers typically cost more in materials and installation, they often last longer with less cracking and offer a timeless, classic look that can increase property value.
Can You Do Stamped Concrete Over An Existing Patio?
Yes! You can create a stamped concrete patio with your existing patio. By applying a stamped concrete finish, you can achieve the desired look, repair any imperfections in the concrete, and even enhance the strength and longevity of your patio.
Stamped Concrete Patio Cost
The cost per square foot of stamped concrete ranges from $8 to $18, and the average size of a patio is 288 square feet, which means you can expect to pay between 2,300 and 5,200 for your stamped concrete patio
The difference in price depends on the size and details you want to add to your design. The cheapest stamped concrete uses one pattern and one color. If you want to add more patterns and colors to your design, it will cost more. To learn more about the cost of a stamped concrete patio, please visit our stamp concrete cost page.
Stamped Concrete Patio
When it comes to stamped concrete patio, expert Chris Sullivan says it’s not something you can do on your own. He says because concrete only gives you one shot at stamping, it’s best to leave it up to the experts. Let’s see what else Chris Sullivan has to say on stamped concrete as an on-site project.
You can also search for stamped concrete patio contractors near you in our directory.
Sealing your Stamped Concrete Patio
The best way to extend the life of a stamped concrete patio is to get sealcoating done to make it easier to care for, protect the surface from damage, and prevent oils, stains, and other chemicals from seeping into the concrete. To seal your patio properly, you’ll need to clean and remove debris and moisture from the surface, and make sure your concrete is cured properly (this may take several weeks after you pour it). Once you’re done cleaning, you can spray down your sealer. Depending on the kind of sealer you use, your sealers can last from 1 to 10 years.
Conclusion
To sum up, stoned concrete patios are a great and affordable way to improve your outdoor space. Whether you’re looking to add curb appeal to your garden, pool deck, or entertainment area, they can add to your home’s curb appeal and value. While it’s possible to create a stoned concrete patio yourself, it’s important to follow the proper steps. You’ll want to consider the pros and cons of the project, and the costs involved, and consult with professionals to ensure a smooth finish. It’s also important to remember that regular maintenance, such as cleaning, resealing, etc., is essential for longevity.
Check out our directory for more information on costs, designs, and pacing contractors.
To increase your patio’s longevity, seal your patio. Get expert advice and transform your outdoor space today – your way to a better patio! Contact Precision Paving and Masonry today!