
Is your driveway starting to show signs of wear and tear?
If so, it may be time to consider your driveway sealcoating.
Driveway sealcoating is an effective way to protect and prolong the life of your driveway, ensuring that it stays looking great for years to come. Sealcoating helps to seal out moisture, preventing cracks and potholes from forming. It also protects against the damaging effects of the sun’s UV rays, which can cause the asphalt to become brittle and prone to cracking. A driveway sealcoating not only protects your investment but also significantly boosts your home’s curb appeal and market value.
But how do you know when it’s time to sealcoat?
Look for signs such as faded color, cracks, and rough surface texture. If you notice any of these indicators, it’s important to take action sooner rather than later.
In this article, we will discuss the top signs that you need driveway sealcoating and provide you with actionable steps to take. Don’t wait until it’s too late – protect your investment and maintain your driveway’s appearance with sealcoating.
Signs That Your Need Driveway Sealcoating
Faded Color:
A loss of the original rich, dark color, indicating exposure to the sun and elements.
Visible Cracks:
Small to large cracks appearing on the surface, a sign of wear and weather impact.
Rough Surface Texture:
The texture becomes coarse and uneven, suggesting erosion and material breakdown.
Water Pooling:
Areas where water tends to accumulate, hinting at an uneven surface and potential for further damage.
Weed Growth in Cracks:
Presence of weeds growing through cracks, indicating deterioration of the driveway’s integrity.
Asphalt Disintegration:
Small pieces of asphalt coming loose or areas of gravelly texture.
Age of the Driveway:
If it’s been several years since the last sealcoat application, it’s likely time for a new one.
Indications of Driveway Deterioration
1. Cracks and Potholes – An Indications of Driveway Deterioration
One of the most obvious signs that you need driveway sealcoating is the presence of cracks and potholes. As your driveway ages, it becomes more susceptible to cracking due to constant exposure to traffic, temperature changes, and moisture.
Cracks can start out small, but if left untreated, they can widen and deepen over time, leading to more significant damage. Potholes, on the other hand, are formed when water seeps into existing cracks and freezes, causing the asphalt to break apart. They not only pose a safety hazard but can also cause damage to vehicles.
If you notice any cracks or potholes in your driveway, it’s crucial to take immediate action by protective driveway sealcoating. This will help seal the cracks, preventing water from seeping in and further deteriorating the asphalt.
2. Fading and Discoloration – Signs of UV Damage
Another sign that your driveway needs sealcoating is fading and discoloration. Over time, exposure to the sun’s UV rays can cause the asphalt to lose its vibrant color, making it appear dull and worn out.
UV rays can also weaken the asphalt, making it more susceptible to cracking and other forms of damage. If you notice that your driveway has lost its original color and is looking faded or discolored, it’s a clear indication that it needs sealcoating.
Sealcoating provides a protective barrier against UV rays, preventing further damage and helping to restore your driveway’s color and appearance.
3. Water Pooling and Drainage Issues – The Need for Proper Sealing
Water pooling and poor drainage are common issues that can occur with aging driveways. When water accumulates on the surface of your driveway and doesn’t drain properly, it can seep into the asphalt, causing it to weaken and deteriorate.
If you notice standing water or areas where water tends to pool after rainfall, it’s a sign that your driveway needs sealcoating. Sealcoating helps to create a smooth, impermeable surface that prevents water from seeping into the asphalt and causing damage.
By addressing water pooling and drainage issues through sealcoating, you can protect your driveway from further deterioration and ensure its longevity.
Fading and Discoloration – Signs of UV Damage
Now that you’re aware of the signs that indicate your driveway needs sealcoating, it’s time to take action.
Priority Steps Included in Driveway Sealcoating
If you decide to proceed with sealcoating, here are the steps to be follow:
1. Clean the driveway:
Remove any debris, dirt, or stains from the surface of your driveway. Use a broom, pressure washer, or driveway cleaner to ensure a clean surface for sealcoating.
2. Repair cracks and potholes:
Fill in any cracks or potholes using a crack filler or asphalt patching compound. Ensure that the repairs are level with the surrounding surface.
3. Prepare the surface:
Remove any vegetation or loose asphalt from the cracks and edges of your driveway. This will ensure proper adhesion of the sealcoat.
4. Apply the sealcoat:
Mix the sealcoat according to the manufacturer’s instructions. Use a squeegee or brush to apply an even layer of sealcoat to your driveway. Start from one end and work your way towards the other, ensuring complete coverage.
5. Allow proper drying time:
Follow the manufacturer’s instructions regarding drying time. It’s essential to allow the sealcoat to cure properly before using your driveway.
Benefits of Driveway Sealcoating for Longevity
Sealcoating is a protective layer applied to asphalt surfaces, offering various benefits for both residential and commercial properties. Here are the key advantages of driveway sealcoating:
1. Enhanced Aesthetic Appeal:
Sealcoating provides a rich, dark finish to asphalt surfaces, enhancing the overall appearance of driveways, parking lots, and other paved areas. It gives a fresh and well-maintained look.
2. Protection Against UV Rays:
Ultraviolet (UV) rays from the sun can cause asphalt to deteriorate over time. Sealcoating acts as a barrier, protecting the asphalt from the harmful effects of UV radiation and preventing premature aging and fading.
3. Prevention of Water Damage:
Driveway Sealcoating forms a waterproof barrier that helps repel water, preventing it from seeping into the underlying layers of asphalt. This reduces the risk of cracks, potholes, and other water-related damage.
4. Resistant to Oil and Chemicals:
Sealcoating creates a protective layer that resists damage from oil spills, gasoline, and other automotive fluids. This helps prevent the asphalt from softening and deteriorating in areas exposed to vehicular traffic.
5. Increased Longevity of Asphalt:
Regular sealcoating can significantly extend the lifespan of asphalt surfaces by providing a protective shield against environmental elements and wear. This can save on long-term maintenance and replacement costs.
6. Ease of Cleaning and Maintenance:
Seal-coated surfaces are smoother and easier to clean. The sealed surface makes it more difficult for dirt, debris, and other contaminants to adhere, simplifying maintenance efforts and keeping the area looking clean.
7. Improved Resistance to Cracking and Erosion:
Sealcoating helps to fill small surface cracks and voids, preventing them from expanding and turning into more significant issues. It adds an extra layer of protection against erosion caused by weather and traffic.
8. Quick Curing and Minimal Disruption:
Sealcoating typically cures quickly, allowing for minimal disruption to daily activities. It’s a relatively fast and efficient way to enhance and protect asphalt surfaces without lengthy downtime.
9. Cost-Effective Maintenance:
Compared to major asphalt repairs or replacement, sealcoating is a cost-effective maintenance solution. It serves as a preventive measure, reducing the need for more extensive and expensive repairs in the future.
10. Enhanced Safety:
Sealcoating provides a smoother surface, reducing the potential for tripping hazards and creating better visibility for road markings. It also improves skid resistance, contributing to overall safety.
11. Environmentally Friendly:
Sealcoatings are often formulated with environmentally friendly materials, and their application helps reduce the need for new asphalt production, contributing to sustainability efforts.
In summary, sealcoating offers a range of benefits, from aesthetic improvements to protective measures that extend the lifespan of asphalt surfaces. Regular application of sealcoating is a proactive approach to asphalt maintenance, providing cost savings and preserving the integrity of paved areas.
How to Take Action and Sealcoat Your Driveway?
One of the first signs that your driveway may need sealcoating is water pooling or drainage issues. When water starts to accumulate on the surface of your driveway and does not drain properly, it can seep into the asphalt and cause damage. Over time, this can lead to cracks, potholes, and other structural issues.
Proper sealcoating creates a protective barrier on the surface of your driveway, preventing water from seeping into the asphalt. This barrier helps to maintain the integrity of the driveway and ensures that water drains properly. If you notice water pooling or poor drainage on your driveway, it’s a clear sign that it’s time to sealcoat.
To take action and address these issues, start by thoroughly cleaning your driveway. Remove any debris, dirt, or leaves that may be blocking the drainage. Use a pressure washer or a hose to wash away any remaining dirt or grime. Once the surface is clean and dry, you can proceed with the sealcoating process.
Diy Sealcoating Vs. Hiring a Professional
When it comes to sealcoating your driveway, you have two options: DIY sealcoating or hiring a professional. Each option has its pros and cons, so it’s important to consider your budget, time constraints, and level of expertise before making a decision.
DIY Sealcoating
If you’re comfortable with DIY projects and have some experience working with asphalt, you may choose to tackle the sealcoating process yourself. DIY sealcoating kits are
readily available at home improvement stores, and they typically include all the necessary materials and instructions.
Before starting the DIY sealcoating process, make sure to carefully read and follow the instructions provided with the kit. Proper preparation is crucial for a successful sealcoating job. Start by cleaning the surface of your driveway thoroughly, removing any dirt, oil stains, or vegetation. Fill any cracks or potholes with a suitable filler and allow it to dry completely.
Next, apply the sealcoat evenly using a squeegee or a brush. Work in small sections, making sure to cover the entire surface of the driveway. Allow the sealcoat to dry for the recommended amount of time before allowing any traffic on the driveway.
While DIY sealcoating can save you money, it does require time, effort, and attention to detail. If you’re not confident in your abilities or simply prefer to leave it to the professionals, hiring a sealcoating company may be the better option for you.
Hiring a Professional
Hiring a professional sealcoating company can provide peace of mind and ensure that the job is done correctly. Professional sealcoating companies have the knowledge, experience, and equipment to complete the job efficiently and effectively.
When choosing a professional sealcoating company, do thorough research and read reviews from previous customers. Look for a company that is licensed, insured, and has a good reputation in the industry. Request quotes from multiple companies and compare their services, prices, and warranties before making a decision.
Once you’ve selected a professional sealcoating com
pany, they will handle the entire process for you. From cleaning and preparing the surface to applying the sealcoat, professionals will ensure that every step is done properly. Hiring a professional can save you time and effort, and you can be confident that the job will be done to a high standard.
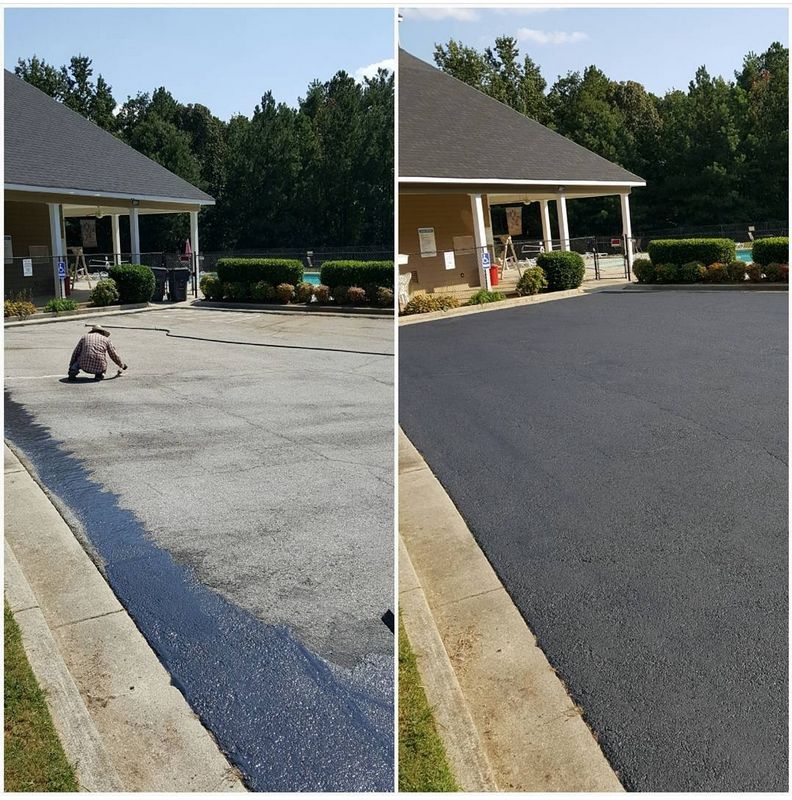
Transformative Sealcoating: Witness the remarkable before-and-after journey of a driveway. On the left, signs of aging like cracks and faded color; on the right, a rejuvenated, seamlessly sealed surface. Discover the power of sealcoating in preserving and enhancing your driveway’s appeal and durability.
Driveway Sealcoating Steps
Whether you choose to tackle the sealcoating process yourself or hire a professional, there are several important steps to follow to ensure a successful sealcoating job. These steps include:
Step 1- Cleaning:
Thoroughly clean the surface of your driveway, removing any dirt, debris, or stains. Use a pressure washer or hose for optimal results.
Step 2- Repairing:
Fill any cracks or potholes with a suitable filler. Allow the filler to dry completely before proceeding.
Step 3- Edging:
Apply an edging product along the edges of your driveway to create a clean, defined border. This will help prevent any accidental overspray onto adjacent surfaces.
Step 4- Mixing:
If you’re using a DIY sealcoating kit, follow the instructions provided to mix the sealcoat properly. Mix until the consistency is smooth and uniform.
Step 5- Application:
Using a squeegee or a brush, apply the sealcoat evenly to the surface of your driveway. Work in small sections, ensuring full coverage. Avoid over-applying or creating puddles.
Step 6- Drying:
Allow the sealcoat to dry for the recommended amount of time. This typically takes a few hours to a full day, depending on the weather conditions.
Step 7- Curing:
After the sealcoat has dried, allow it to cure for at least 24 hours before allowing any traffic on the driveway. Curing time may vary depending on the specific product used.
By following these steps, you can ensure that your driveway is properly sealed and protected against the elements. Regularly inspect your driveway for any signs of wear and tear, and consider resealing every few years to maintain its longevity.
Conclusion and Maintaining a Well-sealed Driveway
Driveway sealcoating is a crucial step in safeguarding its appearance and structural integrity. Recognizing signs that your driveway requires sealcoating and acting promptly can prevent further damage, saving you from expensive repairs down the road.
Whether you decide to undertake the sealcoating process yourself or enlist the services of a professional service provider, proper preparation and application are paramount for a successful outcome. Follow recommended steps and guidelines to ensure your driveway is effectively sealed, ready to withstand the test of time.
After driveway sealcoating, maintenance is key. Avoid using harsh chemicals like oil-based sealers or de-icers, as they can damage the sealcoat. Regularly clean the surface to remove dirt and debris, and promptly address any cracks to prevent further deterioration.
A well-sealed driveway not only enhances curb appeal but also protects your investment. Take action and sealcoat your driveway when needed to enjoy a smooth, durable, and long-lasting surface for years. Don’t wait until it’s too late – protect your driveway and ensure its longevity with sealcoating. Evaluate your driveway today, and for professional assistance, consult with our sealcoating experts to enhance and protect your property.
Ready to safeguard your driveway?
Click here to schedule a consultation with our experienced sealcoating professionals. Ensure the longevity of your investment and enjoy a resilient and appealing driveway for years to come.